Standards and Guidelines
MDC Calendar - Creating Events
Please be aware that the calendar is for events only and is not to be used to promote programs or news related items.
To create a calendar event, please visit www.calendar.mdc.edu/event/create.
Keep this page open on your browser so you may refer to it for guidance. You may also visit Localist here for additional tutorials and explanations.
Main Info
1. Event Name Required:
Enter a title for your event that is no more than 40 characters long. Anything over this amount will be cut off automatically. Avoid starting your event name with long introductions such as "So-and-so presents the second edition of the annual..." Remember, after 40 characters the title will be truncated. You can include those types of details in the event description instead of the name.

Description Required
2. Description

Enter a description for your event
Caution: Pasting Text in the Calendar
When pasting information from a Word document into the calendar, be sure to paste it as special text or you may introduce extraneous code that will distort the text. You may do this by selecting "CTRL + SHIFT + V" for PC or "Option+Shift+Command+V" for Mac.
Status
3. Status
Your event should be set to "Live." Should the status of the event change, you may later select "Cancelled", "Postponed" or "Sold Out."
Schedule / Summary
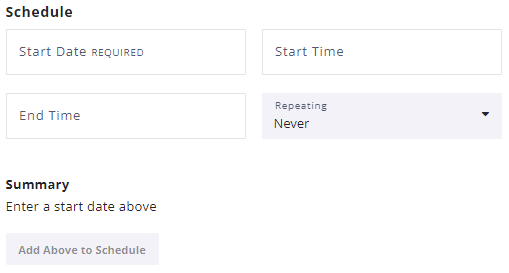
4. Enter Starte Date, Start Time, End Time.
If your event repeats, select the appropriate pattern from the "Repeating" drop down menu. Each selection will give you further options to refine your sequence. The "Summary" section will reflect all of your dates.
Note: Multiple Dates
You can also add random, multiple dates. After your have determined your sequence, be sure to hit "Add Above to Schedule."
5. Location
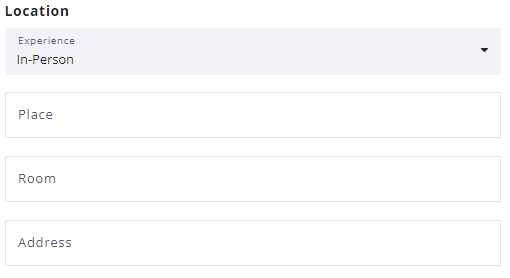
There are three choices for location: "In-Person", "Hybrid" and "Virtual".
In-Person Events
This is for events that take place on campus or at an external location.
This option requires that you enter the "Place", "Room" and "Address".
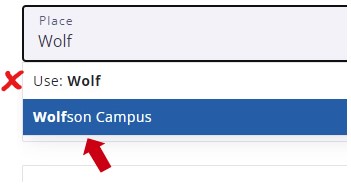
- You must select your campus from the "Event Place" field option. When you begin to write the campus name in the field, the calendar will bring up your campus. Select the full name from the dropdown. The calendar will automatically fill in the campus address.
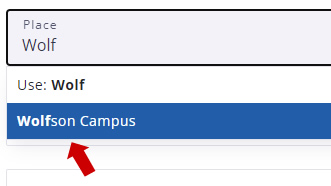
- You know you've done it correctly when it says "linking to:_name_of_campus"
You can further refine the location, if needed, in the "Room" field where you can input things such as plazas, breezeways, buildings, and other areas.

Selecting a place:

Place selected successfully:

Hybrid
This option is used for two situations:
- Events that have both an online and in-person component. If the event has an in-person component:
- You must select your campus from the “Place” dropdown menu. When you begin to write the campus name in the field, the calendar will bring up your campus. Select the full name of your campus from the dropdown. The calendar will automatically fill in the campus address.
- Stricly virtual events. Even if your event is strictly virual, please select an associated campus in the "Place" field.
This option requires that you enter the "Place", "Room" and "Address". The calendar will automatically enter the campus and address when you start to fill in the name. For "Place" please select the campus associated with the event. You can further refine the location if needed in the "Room" field.
For example, if we want to enter Wolfson Campus, we start to type Wolfson and the calendar prompts with the option "Wolfson Campus." Be sure to select the full name of the campus and not any abbreviated form from the drop-down.


Stream URL - This is the link where users can tune into the live stream

Stream Embed Code - If your streaming service supports embedding video, you may place the code here and the video will show on the landing page

Virtual
The "Virtual" option should not be used. If your event is onlilne or has an online component, please select "Hybrid."
Additional Details
6. Hashtag - This is optional. If you use this option, be sure to only use a hashtag created for this event and not a hashtag associated with a non-MDC entity.

7. Event Website - This is optional. If there is a website associated with the event, you may enter it here.

8. Event Contact - This is optional. It is helpful to place an email, phone number, or other contact information to assist attendees to your event.

9. Photo
All events must have a photo uploaded or a generic photo will be used that may not pertain to the subject matter. Please be sure to:
- Use an image that is less than 3 megabytes or it will cause an error.
- No text over images unless it is the name of the event ("Hispanic Heritage Month"), a slogan ("Be MDC!"), or a logo. This complies with accessibility laws.
- Make sure to type in a brief image description in "Photo Description" when you upload an image so that it is accessible to screen readers.
- For best results, the image should be 1500 pixels wide by 1000 pixels high (3 by 2 ratio) so that the event shows most of the image without cropping.

Filters
10. Event Type - Select which type best fits your event.

11. Target Audience - Select the target audience intended for your event. Alumni should only be targeted if it is relevant to them. "Children and Families" should not be selected unless there is specific programing intended for them.

12. Topic - Select a topic that best suits your event. Note: some event groups have their own landing page such as Black History Month, Hispanic Heritage Month, Memorial Day, etc. If you're event is part of one of those groups, be sure to select it so that it will feed into the correct landing page.

Arts & Culture - Only use this box if the event is principally classified as an art, music, dance, etc., specific event. Do not select this if your event only has an "arts" component.

Department - Selet the department that your event falls under

Caution: Department Required for Approval
In order for your event to be approved it is essential that you include the correct department so that it is routed to the correct person.
9. Ticketing
Ticket Cost
- Type "Free" to inform visitors that there is no cost for the event
- Leave this field blank and the "Buy Tickets" button that would show normally on the live event will now say "Register" instead
- Insert the dollar amount if the event is not free

Ticket Link - If there is a cost associated with the event or Free with a register link, please enter the link here.

10. User Engagement
Allow user Activity - This allows/disables comments, reviews or photos
![]()
Hide Attendees - This box shows/hides peopple who subscribed as interested in the event
![]()
Allow User Interest - This allows people to check "I'm interested" or invite others to the event
![]()


